
This blog chapter is now about the initial Cluster setup
This solution is also used by SUSE and Redhat in their products:
https://www.suse.com/products/highavailability/
https://www.redhat.com/en/store/high-availability-add#?sku=RH00025
JWB-Systems can deliver you training and consulting on all kinds of Pacemaker clusters:
SLE321v15 Deploying and Administering SUSE Linux Enterprise High Availability 15
SLE321v12 Deploying and Administering SUSE Linux Enterprise High Availability 12
RHEL 8 / CentOS 8 High Availability
RHEL 7 / CentOS 7 High Availability
We know now the basics, now it’s time to setup the whole thing.
As an example we will create the following cluster:
- 2 Nodes
- STONITH via SBD
- The cluster should deliver a NFS service
- Storage for the NFS Server will be local on the nodes
- One node is active and has the master copy of the storage
- The other node is passive and gets the master copy of the storage replicated via DRBD (Distributed replicated block device, you can imagine it as a RAID1 over 2 partitions on 2 nodes)
I will try to cover both ways of installing, SUSE SLES 12 or 15 and RHEL derivates (in case i talk here about RHEL i mean RHEL 7 or 8 and it’s derivates). I do not recommend Debian or it’s derivates, some of their resource agents are buggy and can cause some trouble.
First of all we need 2 nodes installed with SUSE or Redhat Linux. A minimum install will do, a X server for GUI is not necessary.
I choose on both distributions the default disk layout. We just must make sure to have free disk place on the harddisk for the NFS data later.
Both nodes will be installed exactly the same way.
Network setup:
i mentioned earlier in my blog already that network redundancy is important. If this prerequisite is already fullfilled bcs the nodes are VMs and network reduncancy is done on the hypervisor level, then we dont need to take care of it in the VMs.
If the nodes are bare metal then we must build up the network redundant:
- 2 NICs bonded for user traffic: node1 192.168.111.1/24, node2 192.168.111.2/24
- 2 NICs for cluster communication (can be bonded at OS level, but can also be given to Corosync separately and Corosync handles the redundancy). I choose here the bond variant: node1 172.17.1.1/16, node2 172.17.1.2/16.
- 2 NICs bonded for DRBD replication: node1 172.17.2.1/16, node2 172.17.2.2/16
- The traffic for the SBD LUN we do also on the user traffic network, its just minimal.
- We need an ISCSI target configured that provides one LUN with 10MB, its available under 192.168.111.3/24
After you configured the network on both nodes there are additional things to configure before we go to the cluster:
- on both nodes /etc/hosts with the cluster communication network so that both nodes can reach each other with hostnames and FQDN.
- both nodes must have a reliable time source so that they are time synced.
- SSH PKI between both nodes.
Software installation
After that we can install the cluster software on both nodes:
SLES:
node1:~ # zypper in -t pattern ha_sles
node1:~ # zypper in yast2-iscsi-client
node2:~ # zypper in -t pattern ha_sles
node2:~ # zypper in yast2-iscsi-client
RHEL:
node1:~ # yum install pacemaker pcs resource-agents sbd fence-agents-sbd
node1:~ # yum install iscsi-initiator-utils
node2:~ # yum install pacemaker pcs resource-agents sbd fence-agents-sbd
node2:~ # yum install iscsi-initiator-utils
ISCSI Setup
Now we need to connect first the nodes to the ISCSI LUN, this works the same way on SLES and RHEL. Do the following commands on both nodes:
node1:~ # systemctl enable iscsid.service
node1:~ # systemctl start iscsid.service
node1:~ # iscsiadm -m discovery -t st -p 192.168.111.3
(the IQN output from this command will be used as argument for the next one)
node1:~ # iscsiadm -m node -T iqn.2003-01.org.linux-iscsi.sbd1.x8664:sn.sbd1 -p 192.168.111.3 -l
node1:~ # systemctl restart iscsid.service
node2:~ # systemctl enable iscsid.service
node2:~ # systemctl start iscsid.service
node2:~ # iscsiadm -m discovery -t st -p 192.168.111.3
(the IQN output from this command will be used as argument for the next one)
node2:~ # iscsiadm -m node -T iqn.2003-01.org.linux-iscsi.sbd1.x8664:sn.sbd1 -p 192.168.111.3 -l
node2:~ # systemctl restart iscsid.service
node1:~ # lsscsi
node2:~ # lsscsi
should give you a confirmation that the LIO-ORG disk is available now.
After we are able to see the LIO-ORG disk on both nodes we are able to set up SBD-STONITH.
SBD Setup
SBD needs several setup steps:
- /etc/sysconfig/sbd configfile on both nodes
- watchdog kernel module loaded on both nodes
- SBD disk formatted with the SBD format (done on one node)
- After Cluster initialisation a SBD resource needs to be created in the cluster
/etc/sysconfig/sbd
Create on one node the SBD configfile and copy it to the other node.
The configfile should have the following content. Please adapt the values for the lines SBD_DEVICE, SBD_OPTS
SBD_DEVICE=”/dev/Your SBD device name”
SBD_PACEMAKER=yes
SBD_STARTMODE=always
SBD_DELAY_START=no
SBD_WATCHDOG_DEV=/dev/watchdog
SBD_WATCHDOG_TIMEOUT=5
SBD_TIMEOUT_ACTION=flush,reboot
SBD_MOVE_TO_ROOT_CGROUP=auto
SBD_OPTS=”-W -n node1″
Copy the file to the other node and change there the last parameter
SBD_OPTS=”-W -n node2″
.
watchdog
For bare metal nodes the OS normally detects the fitting watchdog kernel module and loads it, you can control id a watchdog module is loaded by typing this command:
lsmod | grep wdt
There should be a loaded watchdog module. If not you need to find out which watchdog chip is used on your mainboard and load the respective module manually.
If you have a KVM virtual machine you can emulate in the VM config the i6300esb Watchdog and load the module my
node1:~ # modprobe i6300esb
node2:~ # modprobe i6300esb
A generic wachdog you can use is the softdog, it emulates a watchdog in the kernel:
node1:~ # modprobe softdog
node2:~ # modprobe softdog
Don’t forget to make the module load permanent:
node1:~ # echo i6300esb > /etc/modules-load.d/i6300esb.conf
node2:~ # echo i6300esb > /etc/modules-load.d/i6300esb.conf
or
node1:~ # echo softdog > /etc/modules-load.d/softdog.conf
node2:~ # echo softdog > /etc/modules-load.d/softdog.conf
Format the SBD disk
Now format on one node the SBD device:
node1:~ # sbd -d /dev/”your SBD devive name” create
Also make the SBD service starting on all nodes:
node1:~ # systemctl enable sbd
node2:~ # systemctl enable sbd
Now we have finished the SBD preparations and can initialize the cluster
Initialize the cluster
First we need to create on every node a password for the user hacluster:
node1:~ # echo mypassword | passwd –stdin hacluster
node2:~ # echo mypassword | passwd –stdin hacluster
There are several ways to get the initial cluster configuration done, depending on what distribution you use.
Redhat does the cluster initialisation and management with a tool called pcs on one node:
node1:~ # systemctl enable pcsd
node1:~ # systemctl start pcsd
node2:~ # systemctl enable pcsd
node2:~ # systemctl start pcsd
node1:~ # pcs cluster auth node1 node2 -u hacluster -p mypassword–force
node1:~ # pcs cluster setup –name mycluster –transport udp –addr0 172.17.1.0 –mcast0 239.255.1.1 node1 node2
This configures the cluster on both nodes on Redhat
With SUSE you can use the cluster module from yast
node1:~ # yast2 cluster
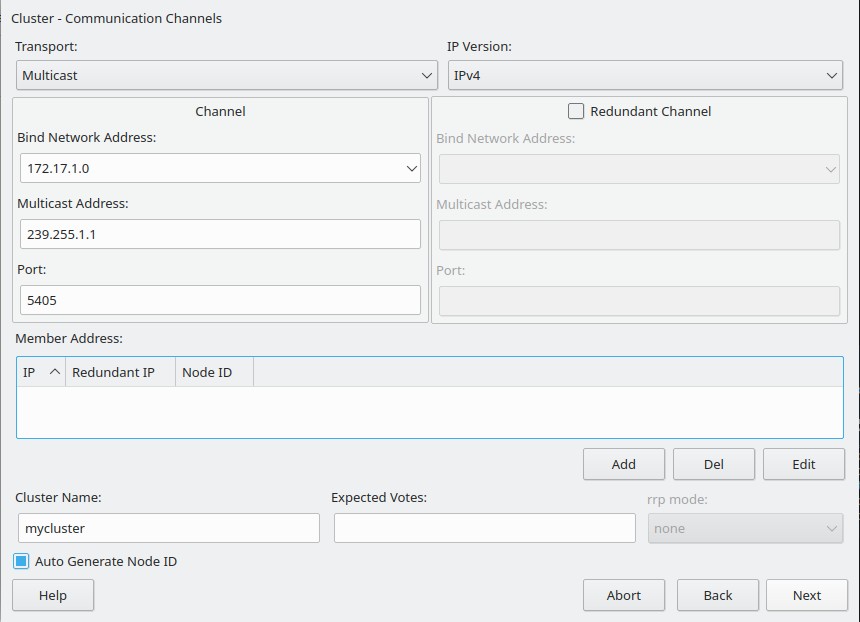
and copy the resulting configfile /etc/corosync.corosync.conf to the other node.
After that you are ready to start your cluster and monitor the cluster status:
Redhat:
node1:~ # pcs cluster start –all
SUSE:
node1:~ # systemctl start pacemaker
node2:~ # systemctl start pacemaker
Cluster Status
node2:~ #crm_mon -rnf
Stack: corosyncCurrent DC: node1 (version 1.1.23-1.el7_9.1-9acf116022) – partition with quorum
Last updated: Mon Mar 15 11:42:36 2021
Last change: Mon Feb 22 10:32:46 2021 by hacluster via crmd on node1
2 nodes configured
0 resource instances configured
Node node1: online
Node node2: online
No inactive resources
Migration Summary:
* Node node2:
* Node node1:
This gives you a live updated commandline view of your current cluster status. If you change your cluster configuration you should always have a terminal window open parallel and watch your cluster status. It’s one of the most often used commands in Pacemaker, you should get used to it.
You can also control the status of corosyng (the communication platform):
node1:~ # corosync-cfgtool -s
Printing ring status.
Local node ID 1
RING ID 0
id = 172.17.1.1
status = ring 0 active with no faults
Add SBD resource to the cluster
Now we need for a working SBD STONITH to add a resource in the cluster:
Redhat:
node1:~ # pcs property set no-quorum-policy=ignore
node1:~ # pcs property set stonith-enabled=true
node1:~ # pcs property set stonith-timeout=60s
node1:~ # pcs property set stonith-watchdog-timeout=0
node1:~ # pcs stonith create sbd fence_sbd devices=”/dev/your-SBD-Device-name”
SUSE:
node1:~ # crm configure property set no-quorum-policy=ignore
node1:~ #crm configure property set stonith-enabled=true
node1:~ #crm configure property set stonith-timeout=60s
node1:~ #crm configure property set stonith-watchdog-timeout=0
node1:~ #crm configure primitive SBD-STONITH stonith:external/sbd
See now the changed cluster status:
node2:~ # crm_mon -rnf
Stack: corosync
Current DC: node1 (version 1.1.23-1.el7_9.1-9acf116022) – partition with quorum
Last updated: Mon Mar 15 11:42:36 2021
Last change: Mon Feb 22 10:32:46 2021 by hacluster via crmd on node1
2 nodes configured
0 resource instances configured
Node node1: online
sbd (stonith:fence_sbd): Started
Node node2: online
No inactive resources
Migration Summary:
* Node node2:
* Node node1:
Test STONITH
Now it’s time to extensively test your STONITH implementation. Remember, the reliable functionality of your cluster strongly depends on your STONITH.
You need to test all possible error cases multiple times and watch the result to make sure the cluster acts in case of an error correct:
- Kill every node ( expected behaviour: Remaining node shows killed node offline unclean, after some seconds offline clean
node2:~ # crm_mon -rnfj
node1:~ # echo c > /proc/sysrq-trigger
and vice versa
- block Corosync communication ( expected behaviour: Nodes cant see each other, one node will try to STONITH the other node, remaining node shows stonithed node offline unclean, after some seconds offline clean
node2:~ # crm_mon -rnfj
node1:~ # iptables -A INPUT-p udp –dport 5405 -j DROP
You also have to test other things, like unavailability of the SBD Device, killing pacemaker and corosync processes and so on. Take your time for that. The better you test the STONITH the more stable the cluster will be.
In the next chapter of the block i will explain deeper the cluster functionality and how to add services to the cluster.
CU soon 🙂