
In the last part of our blog we installed successfully Rancher into our single node K3S Kubernetes cluster. Now let’s talk about the next steps.
The local cluster
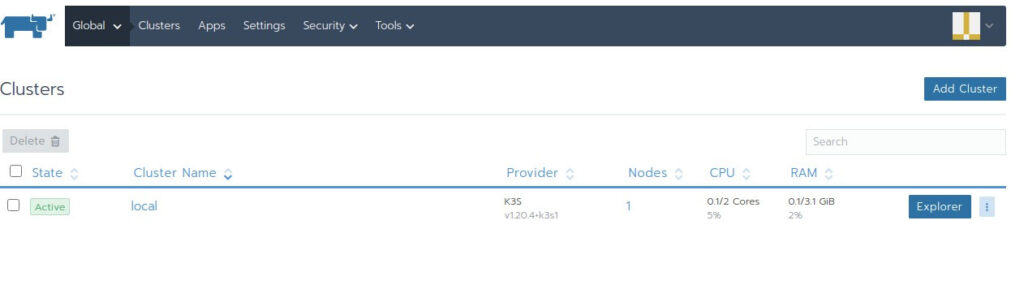
After we logged in into the Rancher Webgui, we can see already in the left top our Rancher managed clusters.
We see here the local cluster:
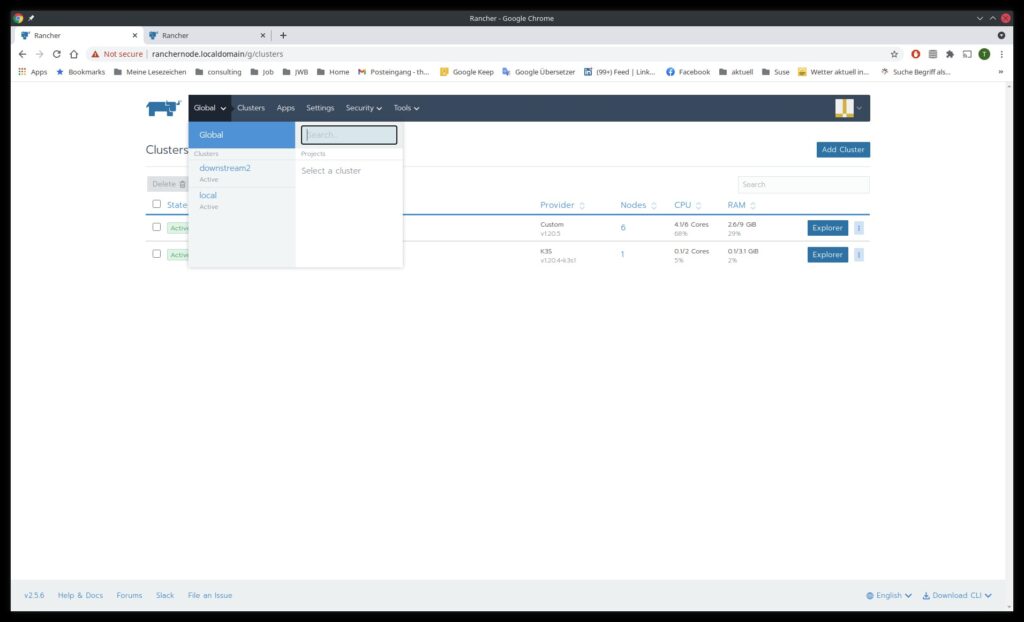
This cluster will be always shown, it represents the cluster that hosts Rancher, our management cluster.
Theoretically you can install already workloads here and that’s all, and for testing this is OK.
But in production enterprise platforms you should not do this. Just use this cluster to manage your other Kubernetes clusters.
And the worst idea is to install workloads in the local cluster and manage with Rancher other clusters! Imagine, the local cluster has full access to the other clusters. If you have a security breach here, all your clusters are affected!
So we leave the local cluster now as it is.
Downstream clusters
Ranchers purpose is to manage so called downstream clusters.
This downstream clusters can be local, on premise, edge or cloud.
A downstream cluster has 2 components installed:
- Cluster Agent
- Node Agents
One Cluster Agent in the downstream cluster and on every node in the downstream cluster a node agent.
This agents open a tunnel connection to the Rancher server so that the Rancher server is able to manage the downstream cluster.
Bottom line:
The Cluster Agent and the Node Agents in the downstream cluster need to be able to reach the Cluster Controllers in the Rancher cluster.
Different forms of downstream clusters
You can distinguish between two main forms of downstream clusters:
- Clusters where Rancher installed Kubernetes on the nodes
- Clusters that had already installed Kubernetes on the nodes and where imported into Rancher management afterwards.
That is a big difference!
If Rancher installed himself Kubernetes on the nodes, it is full aware of etcd (the cluster configuration database) in the downstream cluster and can manage backups and restore of the etcd and also updates for Kubernetes.
This is possible for local clusters, on-premise clusters, edge clusters and cloud clusters.
Rancher will always install RKE Kubernetes on the nodes. In future versions of Rancher you will have the choice to install RKE, K3S or RKE2.
To import preconfigured clusters for management in Rancher it must be only a CNCF certified Kubernetes. Then Rancher can manage it. But there is no update management and Backup/restore management from Rancher for this clusters.
You have to perform this tasks manually on this clusters.
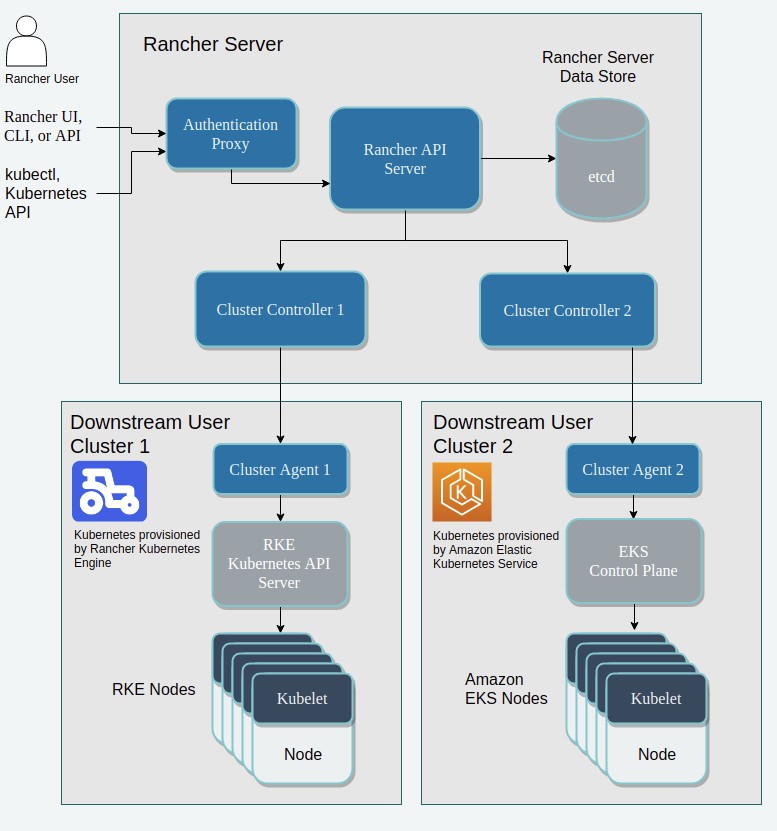
Here we see a pic of some (not all !) possibilities where Rancher can manage downstream clusters:

Examples for downstream clusters in the cloud
If you decide to use AWS (just an example, there are a lot of cloud drivers delivered with Rancher: Azure, Google, Alibaba, Linode and much more) then we have 3 different ways to build our downstream cluster
- Import an already installed EKS (Amazon Elastic Kubernetes Service) cluster
- Rancher provisions a new EKS cluster (Then Amazon is installing Kubernetes in the cluster and the cluster is imported to Rancher, so it’s still a imported cluster). Rancher needs your AWS credentials for this.
- Provision the cluster nodes in AWS manually with Amazon tools and let Rancher install Kubernetes on them (Rancher is then full aware of Kubernetes there and can manage updates and backup/restore)
- Rancher provisions the nodes for you in AWS and installs Kubernetes on them. Again Rancher is then fully aware of Kubernetes there with all advantages.
Number of nodes, node size and node roles
Let’s talk in general about how big cluster nodes should be and how many you need.
A kubernetes cluster node can have 3 different roles:
- etcd
- Control Plane
- Worker
Worker nodes carry the workload in the cluster. Here your containers with your application will be deployed. For High Availability you need minimal 2 nodes with role Worker.
etcd nodes run the cluster configuration database. The complete cluster configuration is stored here. For High Availability you need minimal 3 nodes with role etcd.
Control Plane nodes run the components that are necessary to deploy and manage workloads. For High availability you need minimal 3 nodes with role Control Plane
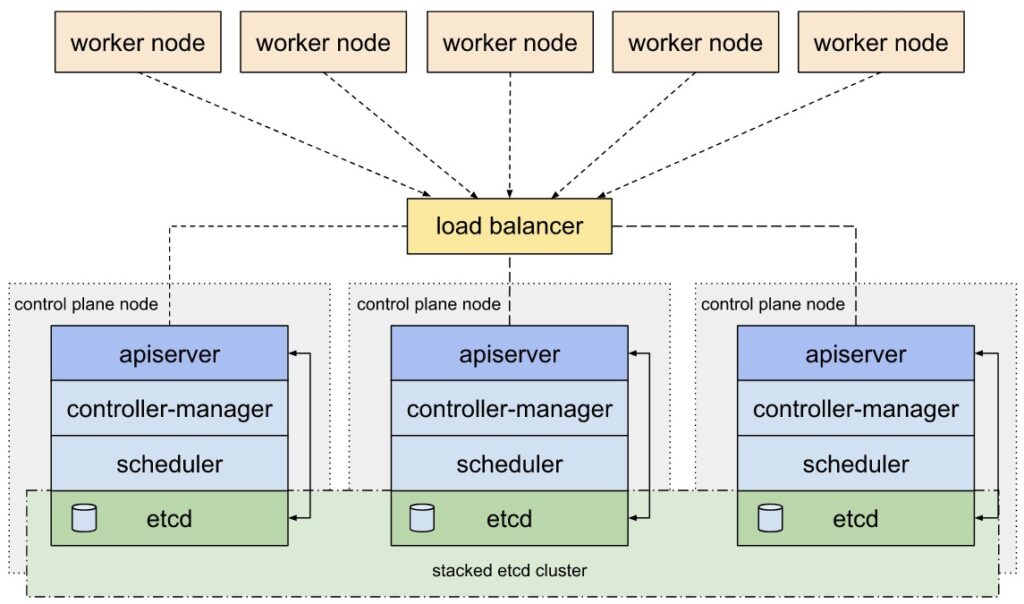
You can combine roles, depending on the size of your cluster. Some examples:
etcd and Control Plane on the same nodes:
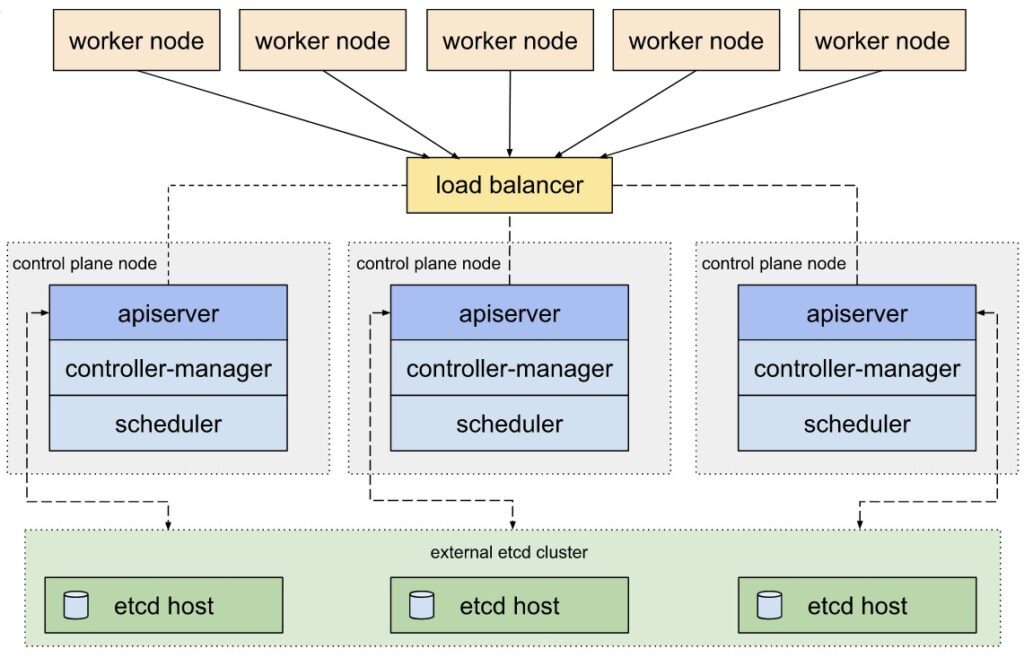
etcd on separate nodes for extensive environments with hundreds of downstream clusters:
Very small clusters: from one to 3 nodes, you can assign all 3 roles to all nodes
Small clusters: 5 node cluster, with node1, node2. node3 role etcd and role Control Plane and node4 node5 role Worker
Medium size cluster: 6 node to 100 Node cluster, node1, node2, node3 role etcd and role Controllplane, the rest of the nodes role Workers
Big size cluster: 100 Nodes to 1000 Nodes, minimum 3 nodes role etcd, minimum 3 nodes role Control Plane, rest of the nodes Worker
This are just examples, there are many variations.
Here is a link that explains very good the advantages and disadvantages of big nodes and fewer nodes against small nodes and more nodes:
https://learnk8s.io/kubernetes-node-size
Keep in mint that also your Rancher management cluster must be sized correctly to be able to manage higher numbers of downstream clusters and nodes in the downstream clusters:
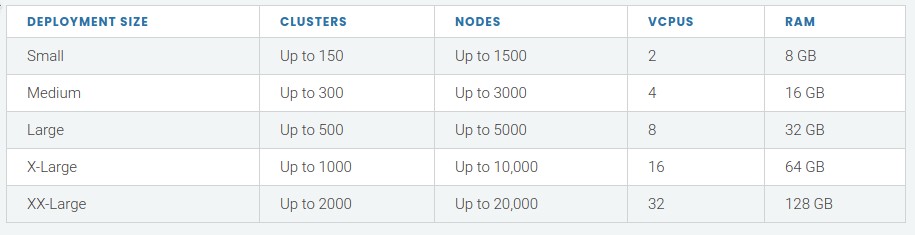
The VCPU and RAM sized apply to each node in the Rancher management cluster.
You can scale out also the Rancher management cluster (add more nodes) to let the management cluster handle higher numbers of downstream clusters and nodes.
Prepare our our local nodes to become a downstream cluster
Now let’s do what we have planned: we use the 6 VMs we have installed locally to deploy Kubernetes on them and build a local downstream cluster.
node1, node2 and node3 will have the roles etcd and Control Plane, node4, node5 and node6 will have the role Worker.
The prerequisites for that nodes are simple:
A minimal installation of a supported OS and installation of a supported Docker Version
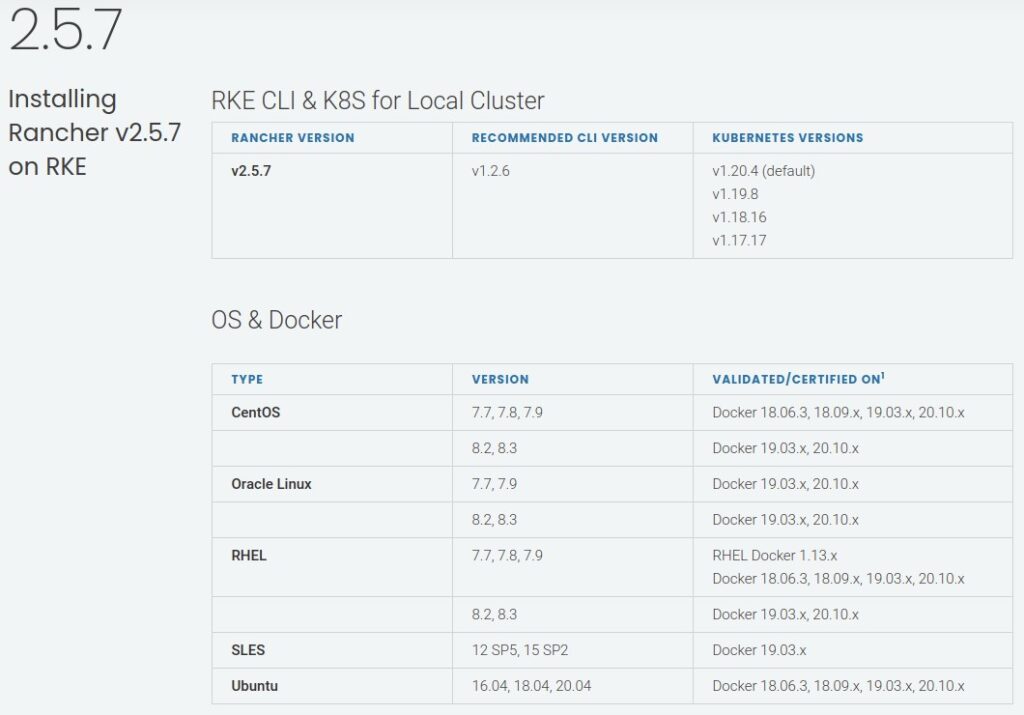
Firewalld turned off
Firewalld is often interfering with the iptables rules created by the Kubernetes network. In an upcoming part we talk about the Kubernetes network in detail.
SELinux
If you use SELinux you must have installed the docker-ce-selinux rpm
Here you can find detailed informations about the node requirements:
https://rancher.com/docs/rancher/v2.5/en/cluster-provisioning/node-requirements
Create the local downstream cluster
Now it’s time to create the downstream cluster.
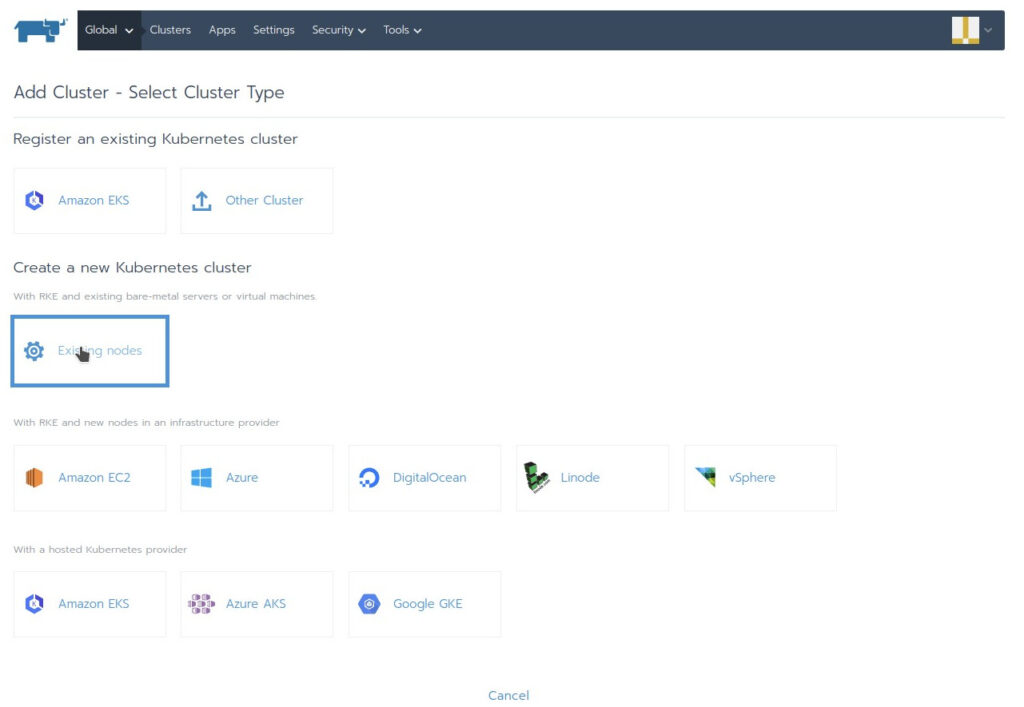
In the Rancher GUI under Global Clusters you press the button “Add Cluster on the top right:
Press ” Existing Nodes”
There are more drivers for different cluster locations available for activation under “Tools” “Drivers”
Add a name for the cluster, i call it here downstream2
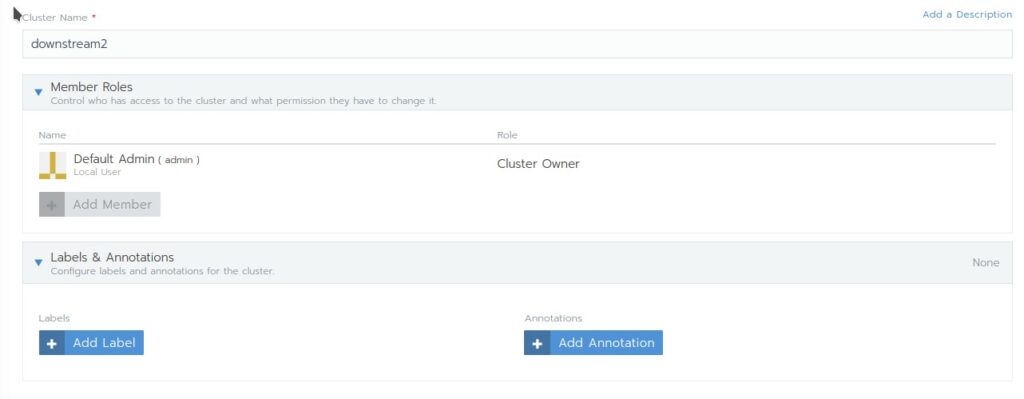
After we named in the first input field our downstream cluster we see a lot of configuration options!
Don’t despair! Most of the default setting are OK for this moment for us. And you can alter most of the settings still after the cluster has been installed.
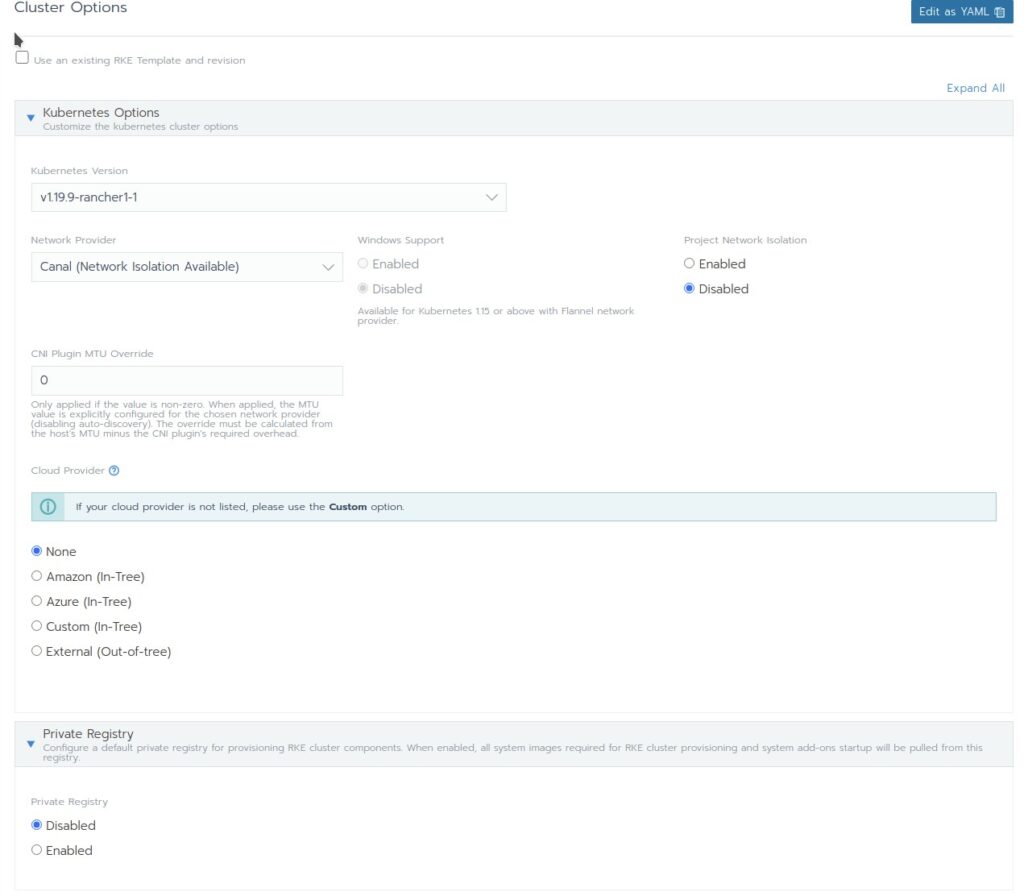
Only one specific setting cannot be altered after the cluster is deployed: The Network provider!
For most environments the Default setting Canal is sufficient. In a later blog we talk more about Network Providers (CNI’s)
Lets talk shortly about some other options
- Member Roles: Here you can add users that you have created before under the tab “Security” in the Global section and give them capabilities in the cluster via Roles
- Labels and Annotations: Add metadata to your cluster
- Use existing RKE Template and Revision: You can specify here a RKE Template that you have created before. Then all options in the setup dialog will be prefilled with the setting of the Template
- Rancher Version: We choose here not the latest version, we choose one version before. We want to show later a Kubernetes update
- Network Provider: Here you can choose what CNI will be used in your Kubernetes cluster. We stay here with Canal
Projekct Network Isolation: If you enable that there will be no communication possible between different projects. This can be used for multi tenancy. - Cloud Provider: since we use no cloud now we stay on none
- Private Registry: You can have your own registry where you host the container images that are necessary to deploy the cluster
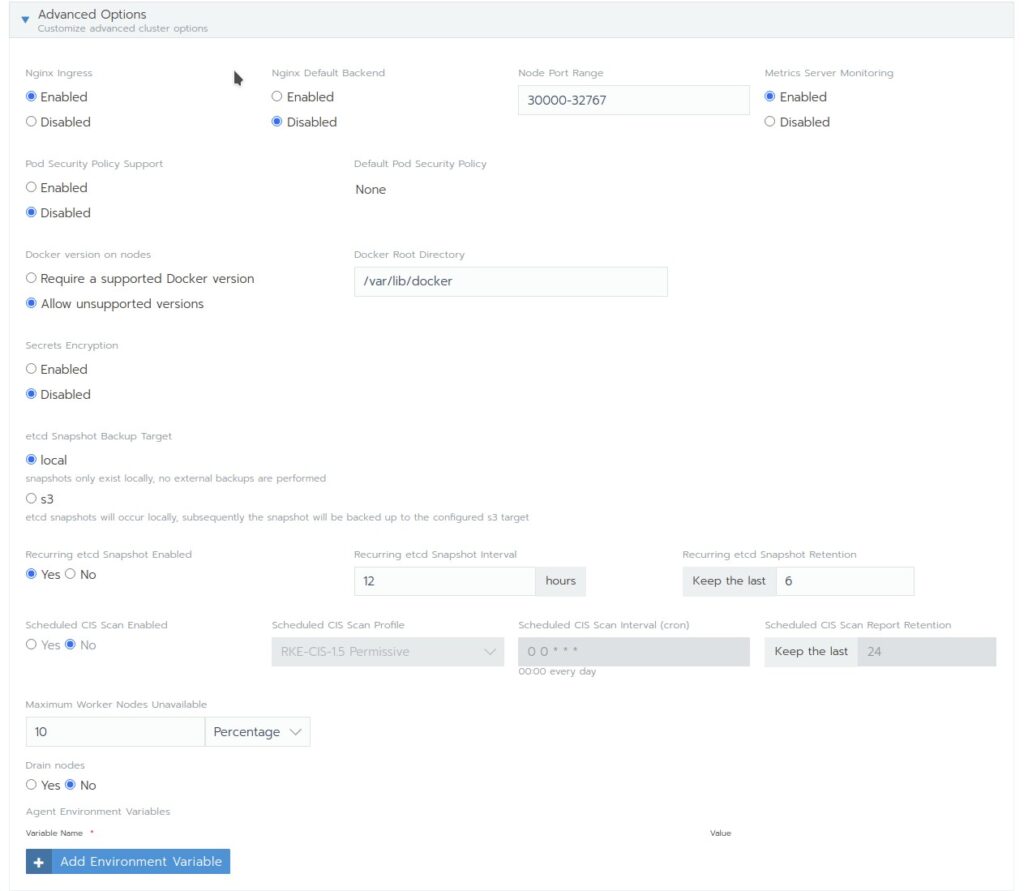
- Advanced Options Here you have a lot of settings. We stay here at the defaults
- Authorized Endpoint: This gives administrator the possibility to manage the downstream cluster directly via command line without going through Rancher.
Some of the additional Rancher features like Projects will then be not visible!
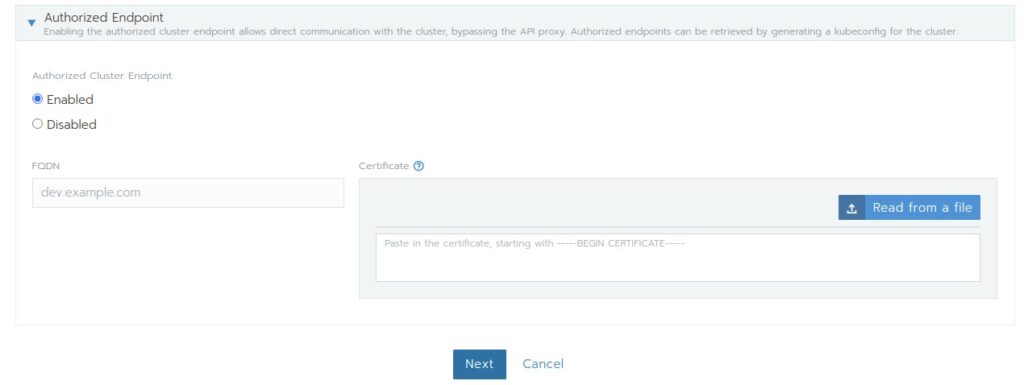
After we pressed the Next button we come to the node screen:
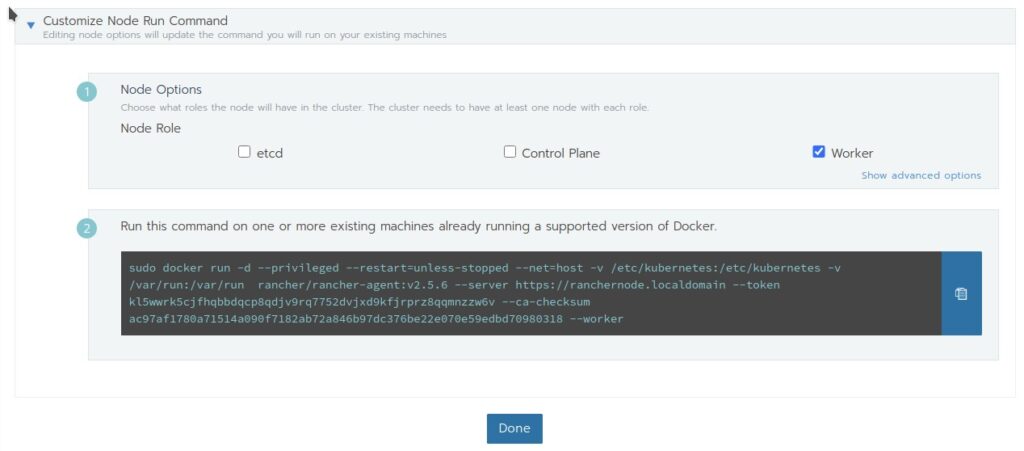
This screen gives us the command that we have to enter on the nodes to create the cluster and register the cluster on Rancher. We must choose here the role a node has to have, copy the command and execute it on the node.
For node1, node2 and node3 we choose role etcd and Control Plane, copy the resulting command and execute it on all 3 nodes.
For node4, node5 and node6 we choose the role Worker, copy the resulting command and execute it on all 3 nodes.
On the nodes docker will now pull the necessary images and install RKE Kubernetes on the nodes.
After that we go in the Rancher GUI to downstream2 Nodes and wait till the nodes appear here and show full functionality with Status “Active”

And that’s it! our first downstream cluster is now fully operational and ready for workloads to be deployed.
In the next part of this blog we talk about some cluster settings and more cool things Rancher can offer us for Kubernetes management.
CU soon 🙂